- For a related variant, see The Blood Drinker (Labyrinth).
| The Blood Drinker | |
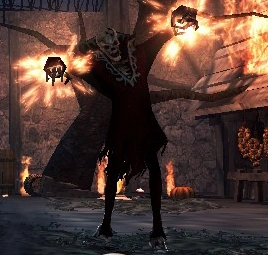 | |
| Type | Vampire |
| Location | Ainle (Boss of Ulchas's Relic. Sub Boss of Blood Prince) |
| Alignment | Aggressive |
| Season | Season 1 |
Stats[ | ]
| Normal / Hard Mode |
|---|
Level: 30 Exp: 576
HP by Group Size -
1: 9,113
2: 12,1503: 15,795
4: 20,655 |
| Hero Mode |
|---|
Level: 30 Exp: 576 |
Related Titles[ | ]
Drops[ | ]
Regular Drops[ | ]
Quest-Only Drops[ | ]
Battle Skills & Attacks[ | ]
- Smashes ground in front of him with flames (same as The Ashen)
- Slashes with his hand while turning.
- One handed fireball throw: He does not track you while doing this and is highly vulnerable. (Normal)
- Two handed fireball throw: He tracks you while doing this. Therefore, it is not advisable to try and combo him while he is doing the animation. (Smash)
- Gathers sparkling energy in his hand and smashes the ground, a 360 degree attack that he only uses if you are close.
Tips & Advice[ | ]
- He usually spams the two handed fireball throw, so soloing him can take a while. Using spears can make soloing much faster, since two spears is enough to stun him.
The two handed fireball throw tracks twice during the animation. You can clearly see when those tracking occur if you run around him while he's charging (he'll turn towards you). After you see him turn the second time, run a little bit further (to ensure you aren't hit by the fireball's AoE) then start your combo. You can easily fit in a combo 4 (like an Amaranth Kick) each time and still have enough time to roll out of his 360 smash (especially if you Heavy Stander Cancel).
Be warned that while it's perfectly guardable, his one-handed fireball CAN occasionally hit through your guard. Not sure why this happens, but it might be that standing right next to him while guarding leads to a diagonal line of fire for the fireball (he's standing tall and you're slouching from guarding) that bypasses the shield. Either stand one or two steps away from him or avoid the fireball altogether (although it is very tempting to counter attack in order to speed up the encounter).